Flash custom rom on any phone
Flash custom rom on any phone
If you’re looking to customize your Android device beyond what the manufacturer allows, flashing a custom ROM is a great way to do it. A custom ROM is essentially a modified version of the Android operating system that can offer additional features and functionality.
In this tutorial, we’ll show you how to flash a custom ROM using TWRP, a custom recovery tool that allows you to install and manage custom firmware on your device. Here’s what you’ll need:
- A Android device with unlocked bootloader
- A custom ROM file downloaded onto your device
- TWRP custom recovery installed on your device
Keep in mind that the author of this guide is not responsible for any damage that may occur during the flashing process. If you need further help, you can reach out to the author by dropping an email at bankavarun18@gmail.com.
With these tools in hand, let’s get started with the flashing process:
Step 1: Backup your data Before proceeding with any kind of firmware flashing, it’s essential to create a backup of your data. This includes your contacts, messages, photos, videos, and any other important data on your device. You can use the built-in backup feature in TWRP, or you can use a third-party backup tool such as Titanium Backup.
Step 2: Download the custom ROM Next, you’ll need to download the custom ROM that you want to install onto your device. Make sure to download the correct version for your device model and carrier. Once the ROM is downloaded, transfer it to your device’s internal storage or a flash drive or SD card.
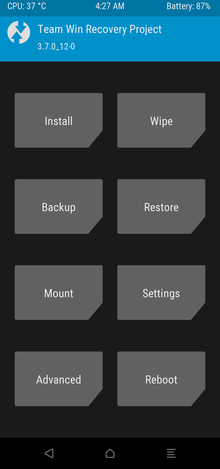
Step 3: Boot into TWRP recovery To enter TWRP recovery mode, first turn off your device. Then press and hold the volume up and power buttons simultaneously until the device boots into recovery mode.

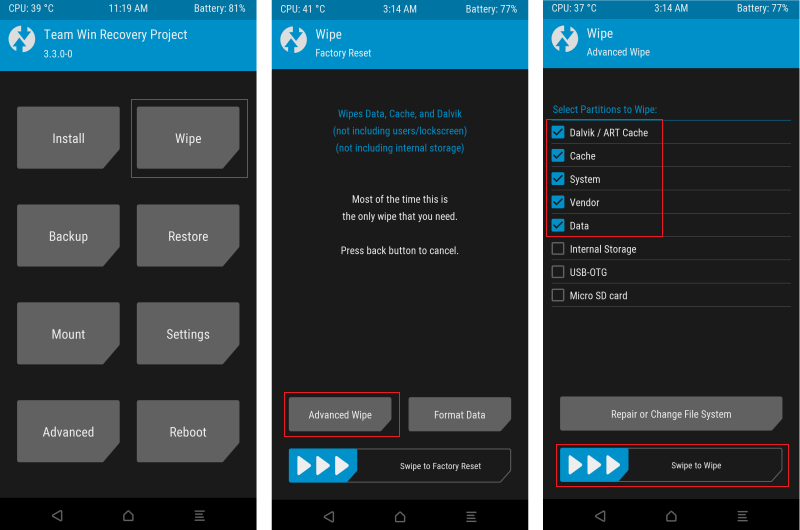
Step 4: Wipe the data partition Before flashing a new ROM, it’s recommended to wipe the data partition to ensure a clean installation. To do this, tap the “Wipe” button in TWRP, then select “Advanced Wipe” and choose the “Data” partition. Swipe the slider to wipe the partition.

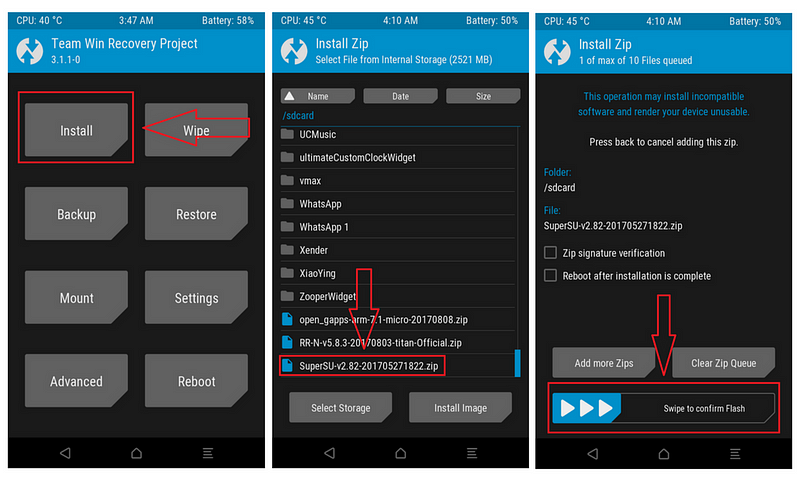
Step 5: Install the custom ROM Now it’s time to flash the custom ROM. Tap the “Install” button in TWRP, then navigate to the location where you saved the custom ROM file. Select the file and swipe the slider to begin the installation process.
If you can not see your files, you may need to head over to mount and then tick the flashing drive or internal storage…..

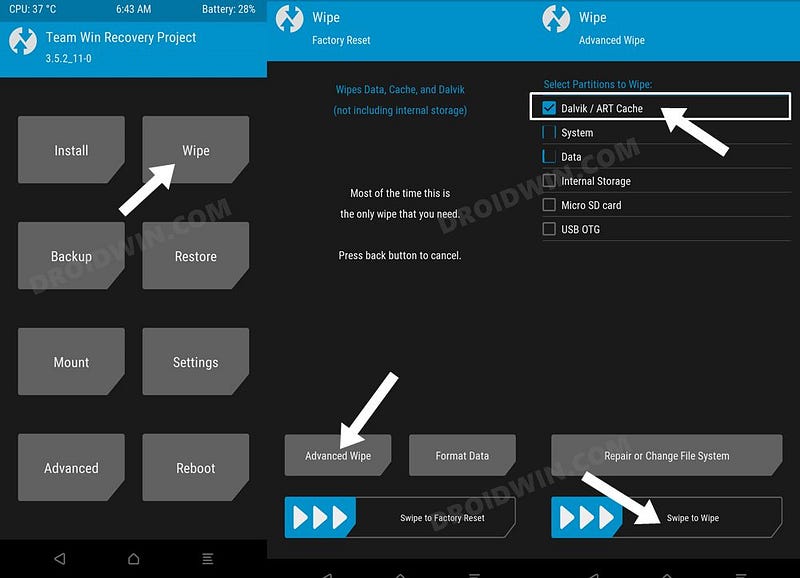
Step 6: Clear the cache and dalvik cache Once the ROM installation is complete, it’s recommended to clear the cache and dalvik cache in TWRP to ensure optimal performance. Tap the “Wipe” button, then select “Advanced Wipe” and choose the “Cache” and “Dalvik Cache” partitions. Swipe the slider to wipe the partitions.

Step 7: Reboot your device Finally, tap the “Reboot” button in TWRP and select “System” to reboot your device. It may take a few minutes for the first boot after installing a new ROM, so be patient.
Congratulations! You have successfully flashed a custom ROM using TWRP. Your device should now be running the custom firmware with all of its new features and functionality.
Conclusion
The process for flashing a GSI using TWRP is very similar to flashing a custom ROM, and the same precautions and risks apply. Make sure to download a GSI that is compatible with your device’s architecture (arm, arm64, etc.) and to follow the same steps for creating a backup, wiping the data partition, and installing the new firmware.
As always, please proceed with caution and at your own risk. If you have any questions or encounter any problems during the flashing process, feel free to reach out for support.
In conclusion, flashing a custom ROM or GSI using TWRP can be a great way to customize your Android device and unlock new features and functionality. However, it’s important to understand that the process can be risky and may cause permanent damage to your device if not done correctly.